Setup Ansible Control Node
gsd-ansible.Categories:
Projects:
c2platform/rws/ansible-gis
,
c2platform.core
This tutorial provides step-by-step instructions for setting up an
Ansible Control Node
on Red Hat 8, specifically on the gsd-ansible node. While primarily intended
for Ansible Ad-Hoc tasks, this control node can also serve as a graphical
user interface (GUI) for lightweight development work, accessible via RDP
(Remote Desktop Protocol). By following these guidelines, you’ll be able to
create a versatile control node environment that supports both quick automation
tasks and convenient development capabilities.
Overview
This guide sets up an Ansibel Control Node / lightweight development environment. This setupinvolves Vagrant and Ansible executing the following tasks:
- Vagrant employs the VirtualBox Provider to instantiate a Red Hat 8 VM, including registering the node with Red Hat using a Developer license subscription. See Streamlining RHEL Registration and Subscription Automation for more information.
- Vagrant utilizes the Ansible provisioner to run an playbook that installs or upgrades essential packages like pip, setuptools, psycopg2-binary, curl, git, and tree. Additionally, configure Xrdp to start at boot time and set up a Red Hat Desktop Environment.
| Node | OS | Provider | Purpose |
|---|---|---|---|
gsd-ansible | Red Hat 8 | VirtualBox | Ansible Controle Node and lightweight development environment |
The diagram below illustrates the default provisioning process in the
development environment using Vagrant and Ansible. The following VMs are
created: gsd-ansible, gsd-agserver1 and gsd-rproxy1.
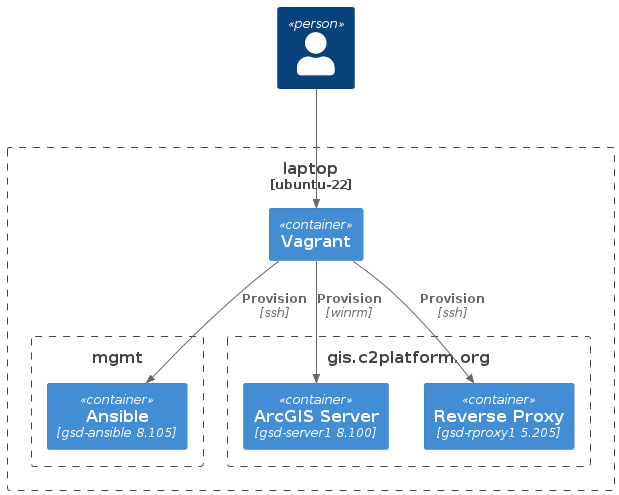
The Ansible Control Node, gsd-ansible, can be used separately to provision and
manage the nodes using Ansible without relying on Vagrant.
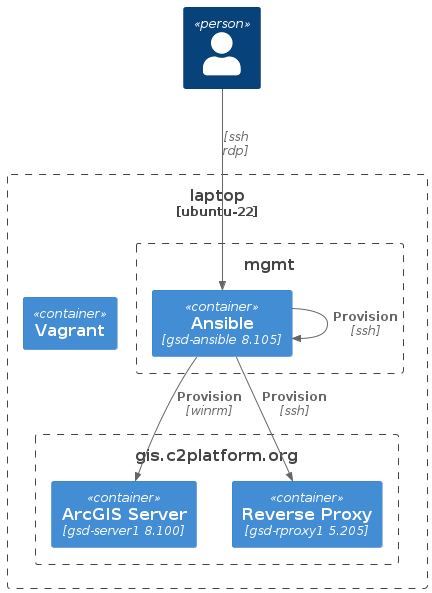
These diagrams demonstrate the two provisioning approaches: one using Vagrant and Ansible together, and the other using Ansible independently with the Ansible Control Node.
Prerequisites
- Red Hat requires a subscription of course. In the RWS development environment we can use a developer license .
- RWS Development Environment .
Setup
To set up the node, run the following command:
vagrant up gsd-ansible
Verify
To verify the node has be correctly created / provisioned, in this section it is
described how to connect to the node, create an Ansible environment, install
Ansible and then provision node gsd-rproxy1 using this environment. These
steps mimic the steps that each engineer must follow at RWS to setup their own
personalized Ansible workspace.
RDP Connection
You can now create a RDP connection to this node using for example
Remmina
.
You should be able to connect using user vagrant with password vagrant.
Note:
The two sections below assume that you are insidegsd-ansible VM via an RDP
connection or SSH.Ansible environment
Install pyenv :
curl https://pyenv.run | bash
Add the following lines to ~/.bashrc:
export PYENV_ROOT="$HOME/.pyenv"
command -v pyenv >/dev/null || export PATH="$PYENV_ROOT/bin:$PATH"
eval "$(pyenv init -)"
Install Python 3.10.6
source ~/.bashrc
pyenv install 3.10.6
pyenv global 3.10.6
Create Python virtual environment using penv virtualenv:
pyenv virtualenv rws
pyenv virtualenvs  # this will output all virtual environments available including "rws"
pyenv virtualenv-init rws
pyenv activate rws
In ~/.bashrc add
eval "$(pyenv virtualenv-init -)"
pyenv activate rws
Install Ansible
Install Ansible, including PIP packages for Kerberos and WinRM.
pip3 install -r requirements.txt # ansible creates this file in vagrant home
Alternatively, you can run the following commands:
pip3 install --upgrade pip
pip3 install ansible-core==2.11.12
pip3 install setuptools_rust
pip3 install yamllint==1.28.0 ansible-lint==6.8.6 pre-commit==2.20.0
pip3 install pywinrm==0.4.3
pip3 install requests-kerberos
pip3 install pywinrm[kerberos] requests-kerberos pykerberos
Mount Dev Collections
Once you have set up your Ansible environment, you can proceed with various
tasks such as cloning the
c2platform/rws/ansible-gis
project, downloading Ansible
collections, and provisioning nodes using Ansible.
To ensure that your environment is functional, the easiest way however is to
utilize the /vagrant mount. This mount contains the
c2platform/rws/ansible-gis
project from your host. The
only missing component is the ansible-dev-collections folder.
To incorporate this folder into gsd-ansible, you can create a special local
and hidden file called .sync_folders.yml with the following contents. This
file is in the git ignore list:
---
- src: ../ansible-dev-collections/
  target: /ansible-dev-collections
Provision with Ansible
Once you reload, you should be able to provision the gsd environment as follows:
vagrant reload gsd-ansible  # will create /ansible-dev-collections mount
vagrant ssh gsd-ansible
cd /vagrant
ansible-playbook plays/mw/reverse-proxy.yml -i hosts.ini
Please note that the above provision assumes that you have the gsd-agserver1
already up and running.
With the Ansible Control Node, gsd-ansible, you can now manage the nodes using
Ansible alone. Vagrant is no longer involved in the process.
See
Vagrant Sync folders
for more information about the .sync_folders.yml file.
Review
The provisioning process for this node is determined by the file in the folder
group_vars/ansible file, which utilizes the bootstrap_packages
list, as well as the plays/mgmt/ansible.yml play. You can find the files in
the Ansible project
c2platform/rws/ansible-gis
.
Feedback
Was this page helpful?
Glad to hear it! Please tell us how we can improve.
Sorry to hear that. Please tell us how we can improve.